> ## Documentation Index
> Fetch the complete documentation index at: https://developers.deepl.com/llms.txt
> Use this file to discover all available pages before exploring further.
# DeepL MCP Server: How to build and use translation in LLM applications
> Efficiently translate content with AI-powered translation and enhance your interactions with large language models.
This cookbook is intended for developers who want to learn how to build an MCP server using the DeepL API. If you're looking to simply use a pre-built DeepL MCP server without building it yourself, please go directly to the [GitHub repository](https://github.com/DeepLcom/deepl-mcp-server) for installation instructions.
Large Language Models excel at many tasks but may not provide optimal translations for all languages. By combining the DeepL API with the Model Context Protocol (MCP), you can provide Claude and other MCP-compatible clients with access to DeepL's specialized translation capabilities, bringing in the ability to provide translations across numerous languages.
In this cookbook, we'll explore how to create an MCP server that connects DeepL's translation API with clients like Claude Desktop, GitHub Copilot, and any other clients that work with MCPs! This allows you to seamlessly translate text between languages within your conversations. To look at the code and start using it, go to [GitHub](https://github.com/DeepLcom/deepl-mcp-server).
### What is MCP?
The Model Context Protocol (MCP) is an open standard introduced by Anthropic that standardizes how AI applications connect with external tools, data sources, and systems. Think of it as a "USB for AI integrations" – it provides a universal adapter between AI applications and external data sources through a standardized interface.
This elegant design solves the integrations problem: instead of building custom connectors between each AI application and each external tool, developers only need to implement the MCP standard once on each side, reducing integration complexity. In the context of the DeepL MCP Server, MCP allows AI assistants to seamlessly access DeepL's specialized translation capabilities while maintaining a consistent, secure communication protocol, combining the strengths of both systems to deliver a better User Experience.
### Setting Up Your DeepL MCP Server
#### Prerequisites
Before you begin, you'll need:
* A DeepL API key (get one at [DeepL API](https://www.deepl.com/pro-api))
* Node.js installed on your system
* Basic familiarity with JavaScript/Node.js
First, let's set up a new Node.js project:
```bash theme={null}
# Create a new directory for our project
mkdir deepl-mcp-server
cd deepl-mcp-server
# Initialize npm project
npm init -y
# Install dependencies
npm install @modelcontextprotocol/sdk deepl-node zod
```
Here's what each dependency does:
* `@modelcontextprotocol/sdk`: The MCP SDK that allows our server to communicate with MCP clients like Claude Desktop
* `deepl-node`: Official DeepL API client for Node.js, making it easy to interact with DeepL's translation services
* `zod`: A TypeScript-first schema validation library that we'll use to define our tool parameters
The Model Context Protocol (MCP) enables AI systems to access external tools, providing them with specialized capabilities beyond their built-in functionality. For translation tasks, this is particularly valuable as it combines DeepL's translation expertise with Claude's conversational abilities.
The `McpServer` class is the core of our implementation. It handles all the protocol-specific details of communicating with MCP clients. The `StdioServerTransport` uses standard input/output streams for communication, which works well with Claude Desktop's execution model where it spawns separate processes for each server.
We're using environment variables to pass the DeepL API key to our server, which is a secure way to handle sensitive credentials. Create a file named `src/index.mjs` with the following structure:
```javascript theme={null}
import { McpServer } from "@modelcontextprotocol/sdk/server/mcp.js";
import { StdioServerTransport } from "@modelcontextprotocol/sdk/server/stdio.js";
import { z } from "zod";
import * as deepl from 'deepl-node';
// The DeepL API Key is passed in as a part of the client configuration
const DEEPL_API_KEY = process.env.DEEPL_API_KEY;
const translator = new deepl.Translator(DEEPL_API_KEY);
// Create server instance
const server = new McpServer({
name: "deepl", // The name clients will use to identify this server
version: "0.1.0-beta.0", // Version for compatibility checks
capabilities: {
resources: {},
tools: {},
},
});
// Server implementation goes here
async function main() {
const transport = new StdioServerTransport();
await server.connect(transport);
console.error("DeepL MCP Server running on stdio");
}
main().catch((error) => {
console.error("Fatal error in main():", error);
process.exit(1);
});
```
Let's add some helper functions to manage language lists and validation. These helper functions serve several important purposes:
1. **Caching**: We cache the language lists to avoid unnecessary API calls, as these lists rarely change and DeepL has API usage limits.
2. **Validation**: Before sending requests to DeepL, we validate that the requested language codes are supported. This provides better error messages to users and prevents unnecessary API calls with invalid parameters.
3. **Separation of concerns**: By extracting these functions, we keep our tool implementations clean and focused on their primary purpose.
The DeepL API distinguishes between source languages (languages you can translate from) and target languages (languages you can translate to), with slightly different sets of supported languages for each direction. Our implementation respects this distinction.
```javascript theme={null}
// Cache for language lists
let sourceLanguagesCache = null;
let targetLanguagesCache = null;
// Helper function to validate languages
async function validateLanguages(sourceLang, targetLang) {
const sourceLanguages = await getSourceLanguages();
const targetLanguages = await getTargetLanguages();
if (sourceLang && !sourceLanguages.some(lang => lang.code === sourceLang)) {
throw new Error(`Invalid source language: ${sourceLang}. Available languages: ${sourceLanguages.map(l => l.code).join(', ')}`);
}
if (!targetLanguages.some(lang => lang.code === targetLang)) {
throw new Error(`Invalid target language: ${targetLang}. Available languages: ${targetLanguages.map(l => l.code).join(', ')}`);
}
}
// Helper functions to get languages
async function getSourceLanguages() {
if (!sourceLanguagesCache) {
sourceLanguagesCache = await translator.getSourceLanguages();
}
return sourceLanguagesCache;
}
async function getTargetLanguages() {
if (!targetLanguagesCache) {
targetLanguagesCache = await translator.getTargetLanguages();
}
return targetLanguagesCache;
}
```
Let's define one of the most important tools our server will provide - the translation tool. For brevity, we'll only show one implementation, but the complete code includes additional tools like `get-source-languages`, `get-target-languages`, and `rephrase-text`.
```javascript theme={null}
server.tool(
"translate-text",
"Translate text to a target language using DeepL API",
{
text: z.string().describe("Text to translate"),
sourceLang: z.string().nullable().describe("Source language code (e.g. 'en', 'de', null for auto-detection)"),
targetLang: z.string().describe("Target language code (e.g. 'en-US', 'de', 'fr')"),
formality: z.enum(['less', 'more', 'default', 'prefer_less', 'prefer_more']).optional().describe("Controls whether translations should lean toward informal or formal language"),
},
async ({ text, sourceLang, targetLang, formality }) => {
try {
// Validate languages before translation
await validateLanguages(sourceLang, targetLang);
const result = await translator.translateText(
text,
sourceLang,
targetLang,
{ formality }
);
return {
content: [
{
type: "text",
text: result.text,
},
{
type: "text",
text: `Detected source language: ${result.detectedSourceLang}`,
},
],
};
} catch (error) {
throw new Error(`Translation failed: ${error.message}`);
}
}
);
```
For the complete implementation of all tools, including `get-source-languages`, `get-target-languages`, and `rephrase-text`, please refer to the [GitHub repository](https://github.com/DeepLcom/deepl-mcp-server).
### Connecting to Claude Desktop
To use your DeepL MCP server with Claude Desktop:
1. Create or edit the Claude Desktop configuration file:
* On macOS: `~/Library/Application Support/Claude/claude_desktop_config.json`
* On Windows: `%AppData%\Claude\claude_desktop_config.json`
* On Linux: `~/.config/Claude/claude_desktop_config.json`
2. Add your DeepL MCP server configuration:
```json theme={null}
{
"mcpServers": {
"deepl": {
"command": "node",
"args": [
"/path/to/deepl-mcp-server/src/index.mjs"
],
"env": {
"DEEPL_API_KEY": "your-api-key-here"
}
}
}
}
```
3. Replace `/path/to/deepl-mcp-server` with the actual path to your server directory
4. Replace `your-api-key-here` with your actual DeepL API key
5. Restart Claude Desktop
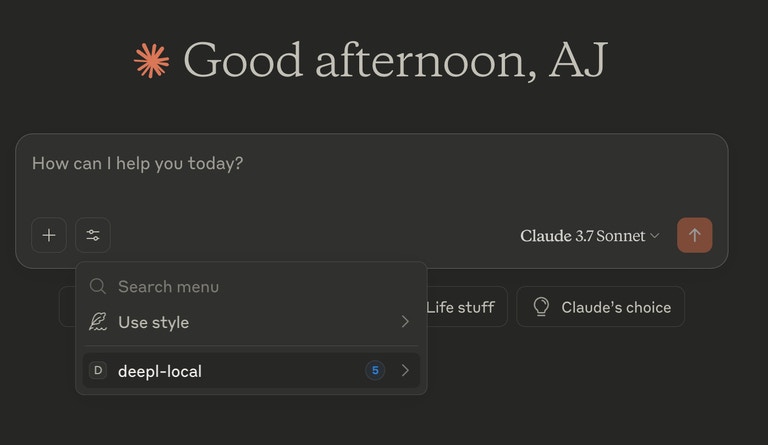
In case it worked, deepl should show up as one of the available tools within the "Search and Tools" menu.
 ### Testing Your Server
You can test your server's capabilities by asking Claude Desktop translation-related questions:
* "Can you translate 'Hello, how are you?' to German using DeepL?"
* "Please translate this paragraph to Japanese using DeepL: \[your text here]"
* "Can you rephrase this text in a more formal way using DeepL: \[your text here]"
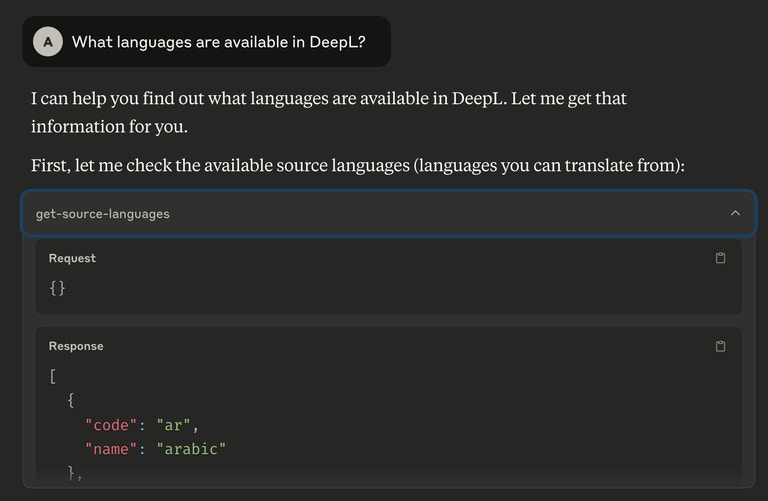
* "What languages can you translate from and to using DeepL?"
Although it isn't an exact science, mentioning the keyword "DeepL" helps Claude understand that we want to use that tool during the interaction.
### Testing Your Server
You can test your server's capabilities by asking Claude Desktop translation-related questions:
* "Can you translate 'Hello, how are you?' to German using DeepL?"
* "Please translate this paragraph to Japanese using DeepL: \[your text here]"
* "Can you rephrase this text in a more formal way using DeepL: \[your text here]"
* "What languages can you translate from and to using DeepL?"
Although it isn't an exact science, mentioning the keyword "DeepL" helps Claude understand that we want to use that tool during the interaction.
 ### Understanding the Code
Let's break down the key components of our implementation:
#### Server Initialization
The `McpServer` class creates an MCP-compatible server that exposes tools to clients:
```javascript theme={null}
const server = new McpServer({
name: "deepl",
version: "0.1.0-beta.0",
capabilities: {
resources: {},
tools: {},
},
});
```
#### Tool Definition
Each tool follows a similar pattern:
1. Name of the tool
2. Description of what it does
3. Schema for parameters (using Zod)
4. Implementation function
For example, the `translate-text` tool:
```javascript theme={null}
server.tool(
"translate-text", // Name
"Translate text using DeepL API", // Description
{ // Parameters schema
text: z.string().describe("Text to translate"),
// ...more parameters
},
async ({ text, sourceLang, targetLang, formality }) => {
// Implementation
}
);
```
#### Transport Setup
The `StdioServerTransport` enables communication between the MCP server and clients:
```javascript theme={null}
const transport = new StdioServerTransport();
await server.connect(transport);
```
### Wrapping Up
By following this cookbook, you've created an MCP server that enables Claude Desktop and other MCP-compatible clients to access DeepL's translation capabilities. This allows seamless translation within your conversations, improving the multilingual capabilities of your AI interactions.
As you expand your server, consider adding more features like:
* Support for document translation
* Custom glossaries for domain-specific terminology
* Batch processing for multiple translations
* Caching to improve performance and reduce API usage
The combination of specialized AI services (like DeepL) with general-purpose AI assistants (like Claude) through MCP creates powerful workflows that combine the strengths of different AI systems.
### References
DeepL API
Model Context Protocol
DeepL MCP Server GitHub
Claude Desktop MCP Configuration
### Understanding the Code
Let's break down the key components of our implementation:
#### Server Initialization
The `McpServer` class creates an MCP-compatible server that exposes tools to clients:
```javascript theme={null}
const server = new McpServer({
name: "deepl",
version: "0.1.0-beta.0",
capabilities: {
resources: {},
tools: {},
},
});
```
#### Tool Definition
Each tool follows a similar pattern:
1. Name of the tool
2. Description of what it does
3. Schema for parameters (using Zod)
4. Implementation function
For example, the `translate-text` tool:
```javascript theme={null}
server.tool(
"translate-text", // Name
"Translate text using DeepL API", // Description
{ // Parameters schema
text: z.string().describe("Text to translate"),
// ...more parameters
},
async ({ text, sourceLang, targetLang, formality }) => {
// Implementation
}
);
```
#### Transport Setup
The `StdioServerTransport` enables communication between the MCP server and clients:
```javascript theme={null}
const transport = new StdioServerTransport();
await server.connect(transport);
```
### Wrapping Up
By following this cookbook, you've created an MCP server that enables Claude Desktop and other MCP-compatible clients to access DeepL's translation capabilities. This allows seamless translation within your conversations, improving the multilingual capabilities of your AI interactions.
As you expand your server, consider adding more features like:
* Support for document translation
* Custom glossaries for domain-specific terminology
* Batch processing for multiple translations
* Caching to improve performance and reduce API usage
The combination of specialized AI services (like DeepL) with general-purpose AI assistants (like Claude) through MCP creates powerful workflows that combine the strengths of different AI systems.
### References
DeepL API
Model Context Protocol
DeepL MCP Server GitHub
Claude Desktop MCP Configuration